Thursday, June 17, 2010

Flower Pot

My husband wanted to kill me! He couldn't believe I snatched this trashy looking flower pot away from our neighbor's trash the other morning! Now mind you, I did not dig through their trash. It was sitting on the side walk waiting for the trash man to wisk it away to the landfill where it would sit for years to come. I like to think of it as re-vamping and re-using. I'm simply being the hippy I am and saving the earth. Plus these light weight flower pots go for $10 at your local DIY store....easily.

 My husband purchased some "hammerred" style spray paint from his work (Lowes--I know I'm one lucky gal) to redo our padio furniture. Well, he bought too much and I found it. My theory? Finder's keepers...
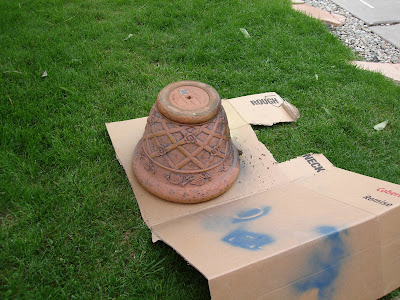
I quickly snatched it up and sprayed a few coats onto my new treasure! See the steps below.


My treasure! Found on the sidewalk...all alone. I gave it a new look and a new home. (below)
.


The first coat....(Below)


The finished product (below)....I believe I ended up putting another coat on after this one, just to be safe. Doesn't look too shappy now does it? The flower pot can now be seen at my mom's house on her new padio they are constructing! As soon as she plants some flowers in it, I'll snap a shot and post it for you.

Wednesday, June 16, 2010

Kabob + Noodles = Yumminess

A couple weekends ago my family grilled out. We made Jamacan Kabobs! YUM. We had some left over and I decided to throw them in a sauce pan with 1/2 c of whole milk, 1 ts of corn starch, and a couple slices of white American cheese. Don't forget to season with salt and pepper to taste. I poured the Kabob mix over some whole wheat noodles and ended up with a great leftover dinner! My husband even gobbled it up and he doesn't like to try new things. :)

Step One: Mixing everything together.


Step Two: Cook your pasta!


Step Three: Pour everything on top and Enjoy!


Plant Holder


This was an old rusted plant holder that was here when we bought the house 5 years ago. I couldn't bare to throw it in the trash. When we were putting up a shed I decided it was time to take it down and paint over it with the "hammered spray paint" my husband bought months ago. Didn't turn out too badly did it?  :)

Refurb of Stool

Okay Ladies and Gentlemen....Refurb #4! This started as a simple stool from a yard sale ($3.00)! Good ol' country blue. I painted it white ($0 I had it on hand) and the fabric was a yard sale special (one stuffed bag was .50).

Same steps as the previous posts.
Measure, cut, staple. Enjoy!


Thursday, June 3, 2010

Chair #2 Refurbished

Okay! Let's get started on our second chair. Tools you will need are as follows:
1. Seat to chair
2. Flat head screwdriver
3. Heavy Duty Stapler
4. Hammer (for those stubborn staples that won't go all the way in)
5. Fabric
6. Pliers (for the stubborn staples/nails that will not come out)
7. Scissors (not pictured)


Start by removing the old fabric. Use your flat head screwdriver. Wedge it under the staples and wiggle the staple out. If you have nails that you need to remove you will want to use the pliers for this step.


After the fabric is completely removed place it on your fabric and cut to shape. You want to use the fabric as a pattern.
I personally start with the top and bottom of the chair. Make sure your lines or pattern on the fabric are straight before stapling!


You can fold under for a "hemmed" look or staple as is. I like a cleaner look so I fold the fabric under once for a nice clean look.


When you get to the corners pull the fabric taunt (not too tight or the seat will look funny later). Fold over so the edges are smooth and do not show on the front. Treat it like a Christmas present. Staple the first fold then the next. Continue until all of the folds are smooth and overlapping. Then continue to your next corner.


I like to do the corners first and then the sides of the chair.


Here is the finished look! I completed this while cooking dinner last night. It is a simple and easy task. Enjoy!