After college my mom bought me the cookbook "500 Treasured Country Recipes" by Martha Storey and Friends. It is still one of my favorites and has managed to stick around for over 7 years (quite the accomplishment, for a cookbook, in my house). It wasn't until a couple years ago that I decided to try the "Queen Elizabeth's Own Cake" recipe. Now it is one of my favorite cakes.
Since it is Chloe and Paige's four year old birthday, I figured this would be a simple fun project for us to do during "art/craft" time. The children LOVE to cook in the kitchen. I still can't believe the moist sweet--not too sweet--fluffiness that comes out of my oven! Even better? I can make it with my organic ingredients and they are all easy to find ingredients!
"Years ago, Esther Green's cake was one of the traditional bake sale items at our annual church fund-raiser. Her source was a secret, but she swore that it was authentically Queen Elizabeth's! Moist and delicious, it's fit for a king and queen alike."
Queen Elizabeth's Own Cake
1 cup boiling water
1 cup chopped dates (I used raisins)
1 level teaspoon baking soda
1 cup sugar
4 Tablespoons butter, softened
1 egg, beaten
1 teaspoon vanilla extract
1 1/2 cups sifted all-purpose flour
1 teaspoon baking powder
1/2 teaspoon salt
1/2 cup coconut or chopped pecans
1. Pre-heat oven to 350 F; grease a 9-inch square cake pan. In a large bowl, pour the water over the dates. Add the soda and let stand while the remaining ingredients are prepared.
2. Cream together the sugar and butter. Add the egg and vanilla; stir in the coconut, flour, baking powder, and salt. Pour into the date mixture and blend well
3. Pour the batter into the cake pan. Bake for 35 (I cooked mine for 45 mins) minutes, or until a toothpick inserted in the center comes out clean. Cool the cake before icing.
Icing
5 Tablespoons light borwn sugar
5 Tablespoons cream
2 Tablespoons butter
1/2 cup coconut or chopped pecans
1. Combine all of the ingredients. Bring to a boil and cook, stirring, for 3 minutes. While the icing is still warm, spread it on the cooled cake. Sprinkle with coconut.
Yum Yum....I don't have a sweet tooth so I usually grab a piece before I pour the icing on, but either way it's delightful!
Check out this link to find a bit of history on the cake. My cookbook follows the same storyline.
My recipe does vary a little bit from this one, but I'm sure it's still de-lish!
Wednesday, March 30, 2011
Saturday, March 26, 2011
Healthy Muffins from a Sister
My sister, Nicole, just passed this recipe on to me. I can't wait to try it! I've also started to follow the blog because the lady's recipe is SO intriguing. I will admit. I'm questioning the entire idea of broccoli in muffins, but mainly because it's the only veggie that I absolutely can not stand. I will try anything at least once though! Next grocery trip I'll purchase me some broccoli!! Review to come.
Thursday, March 24, 2011
Daddy's Arm is Gone!
My son's imagination can definitely run wild when he desires.
To set the stage...my husband was off for the day and decided to take a nap in our room. After feeding all of the children their lunches, I sent them to the potty and their assigned rooms. (I care for my friend's children and they each get their own bed/room.) Tyler is assigned to my room.He went to his bedroom, grabbed his pillow and a toy and proceeded with the task of going to sleep in "mama's bed".
I was down stairs cleaning up the kitchen before finalizing nap time and heard a blood curdling scream. Of course, this 7.5 month pregnant mama, bolts (if one in their 3rd tri-mester can move that quickly) up the stairs thinking that something horrible has happened to one of my babies! (Yes, I include the children I watch as my 'babies'. They have simply won over my heart!)
Tyler is running down the hallway screaming and crying saying, "His arm! His arm is cut off! His arm!"
All I can think of is, "Whose arm? Paige's? Chloe's? Are the girls okay Tyler?"
And start heading toward the girls rooms. When I crack their doors open, they seem nice, safe and snug in their beds, just with confused looks on their faces.
Tyler keeps screaming, "His arm! Mama, his arm!"
By now, I'm thoroughly confused wondering who "he" is....Miles was downstairs in his bed asleep. (How he managed to sleep through all of this I'm still unsure!)
Then I remembered! My husband, Randy, home for the day and must be in our room. I quickly go into our room to check on my husband only to find him under the covers snoozing away...with only his arm sticking out of the blankets.
I turned to Tyler and said, "Tyler, are you talking about Daddy?"
He screams, completely scared out of his poor little mind, "YES! His arm His arm!"
I tried to pick Tyler up to show him that Daddy is only sleeping, but he jumped out of my arms and about fell down the stairs. By now I was trying desperately not to pee my pants laughing. Poor Tyler with a confused look on his face and tears down his eyes obviously wondering why Mom isn't taping Daddy's arm back in place or calling for help.
After much hugging and holding, I was able to calm him down enough to lead him back into the room and show him that Daddy was only sleeping and his arm was 100% attached to his body. Randy, not much help until now, rolled over assuring Tyler that he's quite okay and that Tyler should snuggle up on Mommy's side to take his nap. Tyler, with his adorable nervous laugh and a big cheezy grin, crawled up on my side of the bed and cuddled with his pillow to take his nap.
Monday, March 14, 2011
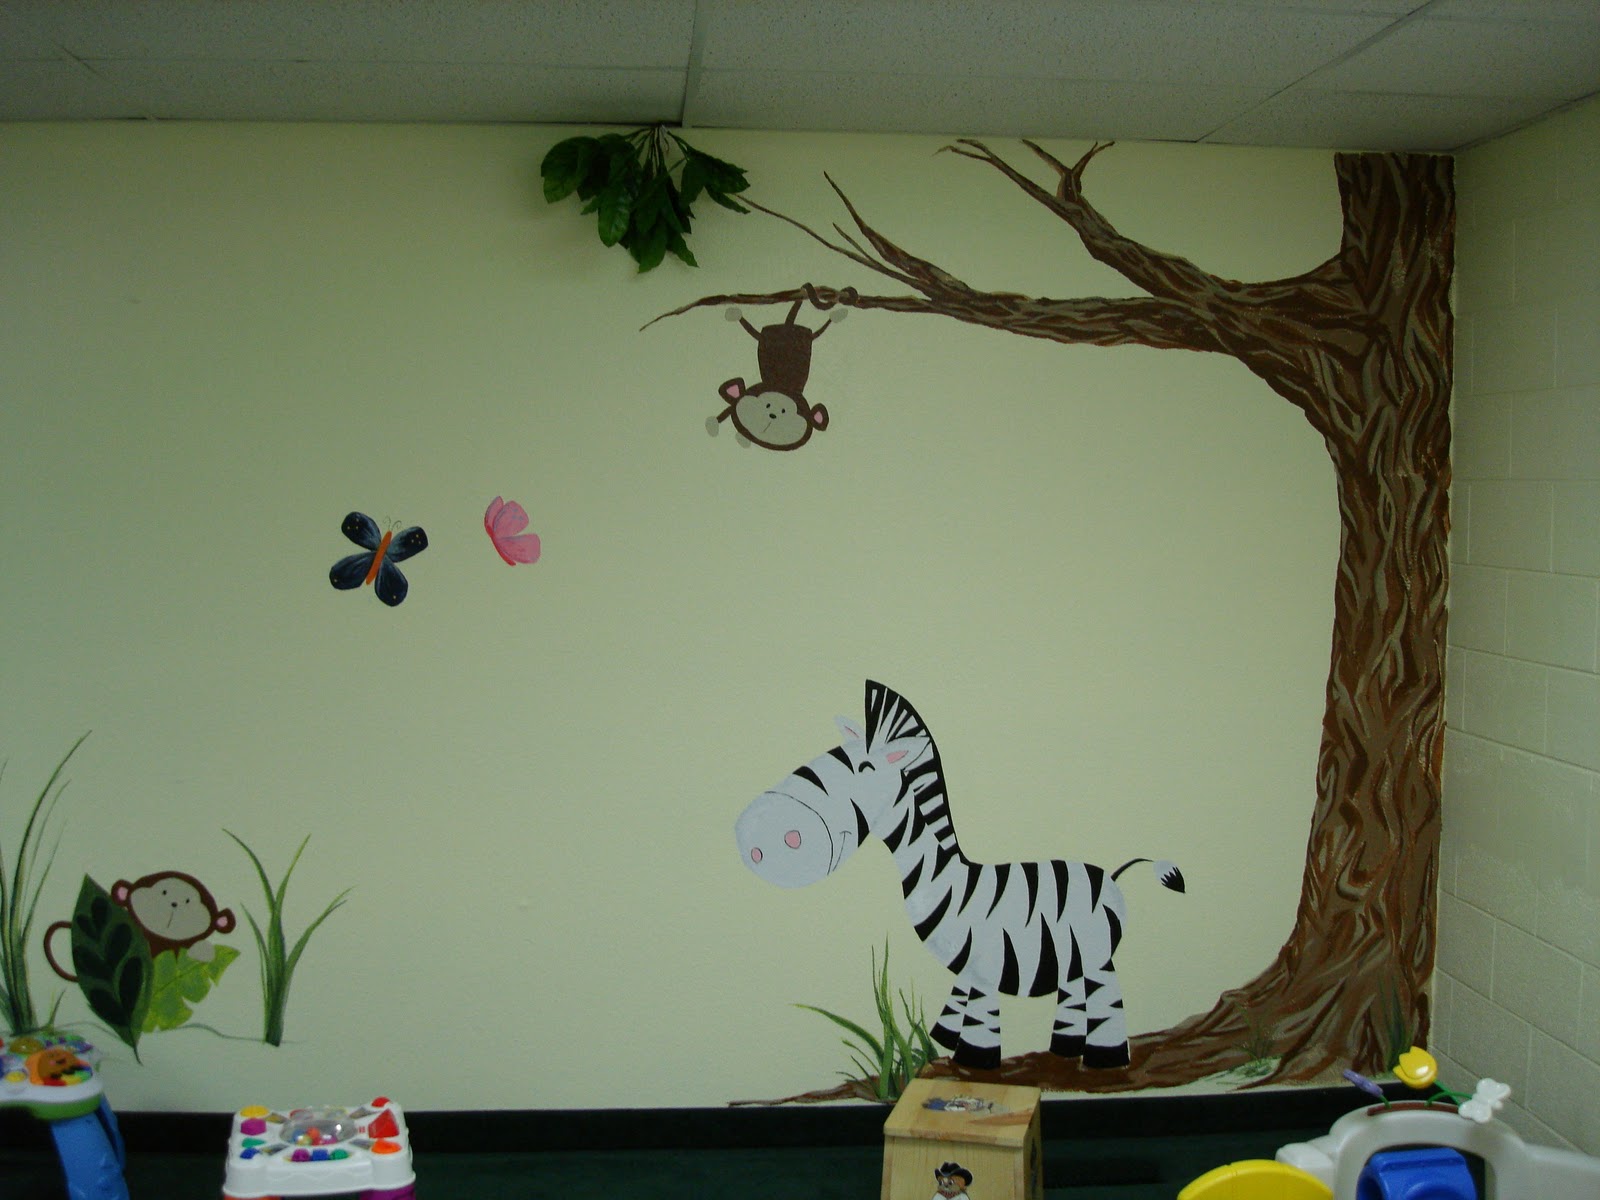
Mural for SunnySide Christian Church
I wanted to post a few photos of the murals I have completed at SunnySide's nursery. I've been asked to do a few more in addition to these, but think I'm going to take a break until baby 'corn muffin' is born. I've been completely drained lately. This weekend has been a weekend of laziness for me. *yawn* Enjoy the photos.


Sunday, March 13, 2011
Successful Bread!
As I mentioned in my pizza dough blog, I am horrible when it comes to working with yeast, but when baby #3 insisted on some yeast rolls tonight for dinner, I caved. I searched high and low on all recipes for an "easy" recipe, found one, baked it, and conquerored the challenge! The family devoured every last roll that I made--yippee!
Quick Yeast Rolls
2 T shortening
3 T sugar (or honey/agave)
1 C Hot water
1 Pkg of active yeast
1 egg beaten
1 ts salt
2 1/4 C flour (any is great, I used organic all purpose)
Mix the first three ingredients and allow to cool until luke warm. Once the water is luke warm add the yeast.
Allow the yeast to disolve. While the yeast is disolving, beat the egg. Add the egg and the salt to the yeast mixture. Slowly add in the flour. The mix will be extremely wet, but trust me, do not add any flour, the end result is worth the stickiness!
Cover the dough and let double in size.
(Useful tip: Place a piece of scotch tape on the outside of the bowl to mark the starting point of the dough.)
Once the dough has doubled, seperate into 8 pieces--mine were more like blobs. I used a pie pan and dropped 8 pieces together and just pulled apart later. Allow the dough to rise another 10-15 minutes. Place in a 425 degree oven for 10 minutes until knife comes out clean.
We topped our rolls with Cinnamon Honey Butter--Nom Nom!
Dig in and enjoy!
*Note: if you want to have any for the dinner table do not taste before you serve dinner.
Subscribe to:
Posts (Atom)