I wanted to share this site. She's SO crafty!
I didn't see a "follow button" on her site yet, so until then....
Sunday, May 30, 2010
Saturday, May 29, 2010
Discounted Gift Cards!
Check this out! A fellow blogger posted this on her site (Hip2save.com). I was blown away by the 50% off sale, but in addition you get another 80% off when you type in the promo code "FLASH".
You can purchase $100 of gift cards for only $8. I also noticed that the website is a BBB approved site.
Make sure you hurry and check it out the gift cards are going quickly. Unfortunately I didn't see any restaurants that Randy would eat at that weren't already "sold out" in the Springs area. Enjoy! Hope some of you can get into your fav. restaurants. :)
Friday, May 28, 2010
Constant Changes
This week has been full of Changes. All good! Tyler had his dental work completed today. Today was the first time he didn't throw a fit around doctors! He was cool and collected. After he woke up he was a bit grumpy but who wouldn't be after being "knocked out"?
Below his the "before" photo. He was one happy little boy!

The second change that stands out is the antique chair I refurbished. Do you remember it? It used to be white! I thought the black looked a LOT better. :)

I hope this blog finds you well and your life full of positive changes! Take care and as always email me if you have questions. :)
Wednesday, May 26, 2010
Guest Bathroom (Stage 2)
Here is the finished project! This all started with Randy knocking out the single door to the laundry room and putting in double doors. This really opens up the ability to move around in the laundry room!
Then he knocked out the closet! We would LOVE to build a bench (a third of this one perhaps?) in this area, but don't have the mula to do that right now. Of course I'm always keeping an eye out for a great deal! Aren't we all? We decided that this would be a great area to put the kids' growth charts!


Now for the bathroom!
We left off with the walls primed and nothing in the bathroom.
Randy then went out and bought an extension for the pipe coming out of the ground and a new wax ring. He also bought a toilet that has super suction power for when the children add a bit too much TP--if you know what I mean. :) He installed the extension to the pipe in the floor then started his tiling work.
I'll walk you through the rest as I show you the pictures.
Below on the left: he painted and then textured the walls. The darker colors pull out after rubbing the wall with a flat surface! Notice the oak cabinet is now painted along with it's brass accessory!
Right Photo: Our new tile, toilet, sink and a few wall accessories.


Below Left Photo: A closer look at the wall accessories! 50% off at Hobby Lobby. I love that place.
Below Right Photo: My new mirror, sink/vanity, and door knob (used as a towel holder)


Below Photo: One of the pictures, taken by Randy. I framed for him two Christmas' ago.

Below Photos: A closer look at my awesome door knob/towel holder


Below Left: My tiled floor designed and installed by my wonderful man.
Below Right: Light fixture installed installed by Randy. Notice the crown molding he put in!


If you want more details on how to DIY, just shoot me an email or leave a comment for me! I'd be happy to send you directions. Also! We don't have much money, by far! Randy works at Lowe's and found the sink, toilet, tile and supplies, paint, mirror and lighting fixture all at Lowe's on clearance! That plus his addition 10% we completed this bathroom for a reasonable amount of dough. Hope you enjoyed this post, Happy Day!
Monday, May 24, 2010
Guest Bathroom (Stage 1)
Since we've moved into our house, my husband, Randy, has attacked several rooms. He has incredible taste and talent! This blog will be about our 1/2 bath located on our garage level. (We live in a tri-level house). When we walked into the house through our garage it felt very claustrophobic and overly crowded. There was a laminate floor that was scuffed and pretty rough looking. Our laundry room (to the right) had a small door making it difficult to maneuver. To the left there was a small closet and a 1/2 bath.


For this posting I'm going to show you pictures of the bathroom and closet remodel. Enjoy!
When we first moved in I agreed that Randy could do whatever he wanted with the downstairs 1/2 bath. He chose a Nascar/Old License Plate theme! Well we out grew that theme and he wanted to change it up one last time. Just wait until you see what he did!


Randy started by removing the Banjo counter top and base cabinet. The huge mirror we took down carefully and sold on Craigslist for $10!
Then he recruited our daughter Keira! Of course she jumped all over the opportunity to destroy anything her daddy pointed toward. Up comes the laminate flooring!


Look at that cute plumber crack!!!!

After tearing up the floor, he took out the toilet (remeber to shut off water!) and plugged the hole with a sock. The last thing we wanted was a stink throughout the house! Then he started with priming the walls. Make sure to go all the way up to the ceiling!


Brown Sugar Scrub
What do you do with an empty glass jar and some brown sugar? Make a scrub of course!
The twin girls I watch made a brown sugar scrub for their Mama's birthday. I just forgot to post the recipe so all can enjoy!
Brown Sugar Scrub
1/2 c. brown sugar
2 Tbls. oil (coconut oil is great, I used olive oil instead)
1 Tbls vanilla
Mix all the above ingredients and place in jar. I wrapped a pretty ribbon around the jar so it looked more like a present.
Use like any other scrub.

Tuesday, May 18, 2010
Mom's Chair--Goodwill Special
My mom is extremely supportive of me staying home! She's my "shopper". She'll go out and find projects for me to work on, then, after I'm done we'll sell it for a profit!
I received a picture of this chair via text message the other day. Yup, Goodwill! The chair was $8, the pillow case $1.60, and everything else I had on hand.
.JPG)
Step One: Remove the cushion. If you flip the chair over, there are usually 4 screws (plus or minus) that attach the seat to the frame. Unscrew and remove cushion.
Step 2: See what you are getting yourself into! Take a picture of how the fabric is attached. Then start removing it from the base. This one was stapled to the bottom so I removed the staples and kept the old fabric for possible use on a different project later.
.JPG)
.JPG)
This is the original fabric! Nasty nasty! Went straight into the washer!
.JPG)
I had some Foam Seat Cushions by Morning Glory left over from a previous project. I love this stuff! Easy to cut.
Step 3: Take the base that the cushion was on and use it as a stencil. Trace it directly onto the foam. Cut out the foam and set aside.
.JPG)
Step 4: optional....I added some fabric glue to the base and glued the foam into place. Makes the base/cushion easier to work with when putting on the fabric.
.JPG)
Foam is attached!
.JPG)
This is the fabric my mom picked out from Goodwill! Beautiful isn't it? We just grabbed an old pillow case and ripped out the hem. It was JUST enough fabric and a little left over for a possible purse?
Step 5: prepare your fabric and remove any hems that may be in place.
.JPG)
Step 6: Now that your fabric is ready, lay your base on top of the fabric. I decided to use the back side of the pillow case for the bottom of the base to give the chair a more finished look. So in my case, I sandwiched the wooden base between the two fabrics and started Step 7. .JPG)
.JPG)
Step 7: Staple the fabric in place. Make sure you fold over the edges so you don't have a sloppy finish like the original chair. This will give it a nice clean look when complete. Work your way around the edges. Make sure to pull the fabric taunt so there are no bubbles.
.JPG)
.JPG) When you get to the corners, think of wrapping a gift. I had a little "jog" in the corner so I pulled and formed the fabric to the corner first and then layered over and stapled the fabric in place to give it a smooth finish.
When you get to the corners, think of wrapping a gift. I had a little "jog" in the corner so I pulled and formed the fabric to the corner first and then layered over and stapled the fabric in place to give it a smooth finish. .JPG)
When you are done it should look something like this. Remember, I chose to "sandwich" the wood base so the bottom had a more finished appearance (left photo). I completed the above steps and then lay the bottom piece on folding over the edges for a "make shift" hem. The right photo is the top of the cushion. Pretty huh? Good choice mom!
.JPG)
.JPG) I chose to sand down the frame just a bit to distress the paint. I'm still trying to decide if I want to paint it white or not....I kinda like this gray color it came with... :)
I chose to sand down the frame just a bit to distress the paint. I'm still trying to decide if I want to paint it white or not....I kinda like this gray color it came with... :) This entire project cost us $9.60! If you enjoyed this post or have anything thoughts on this project, please, leave me a comment! I LOVE them!
.JPG)
Monday, May 17, 2010
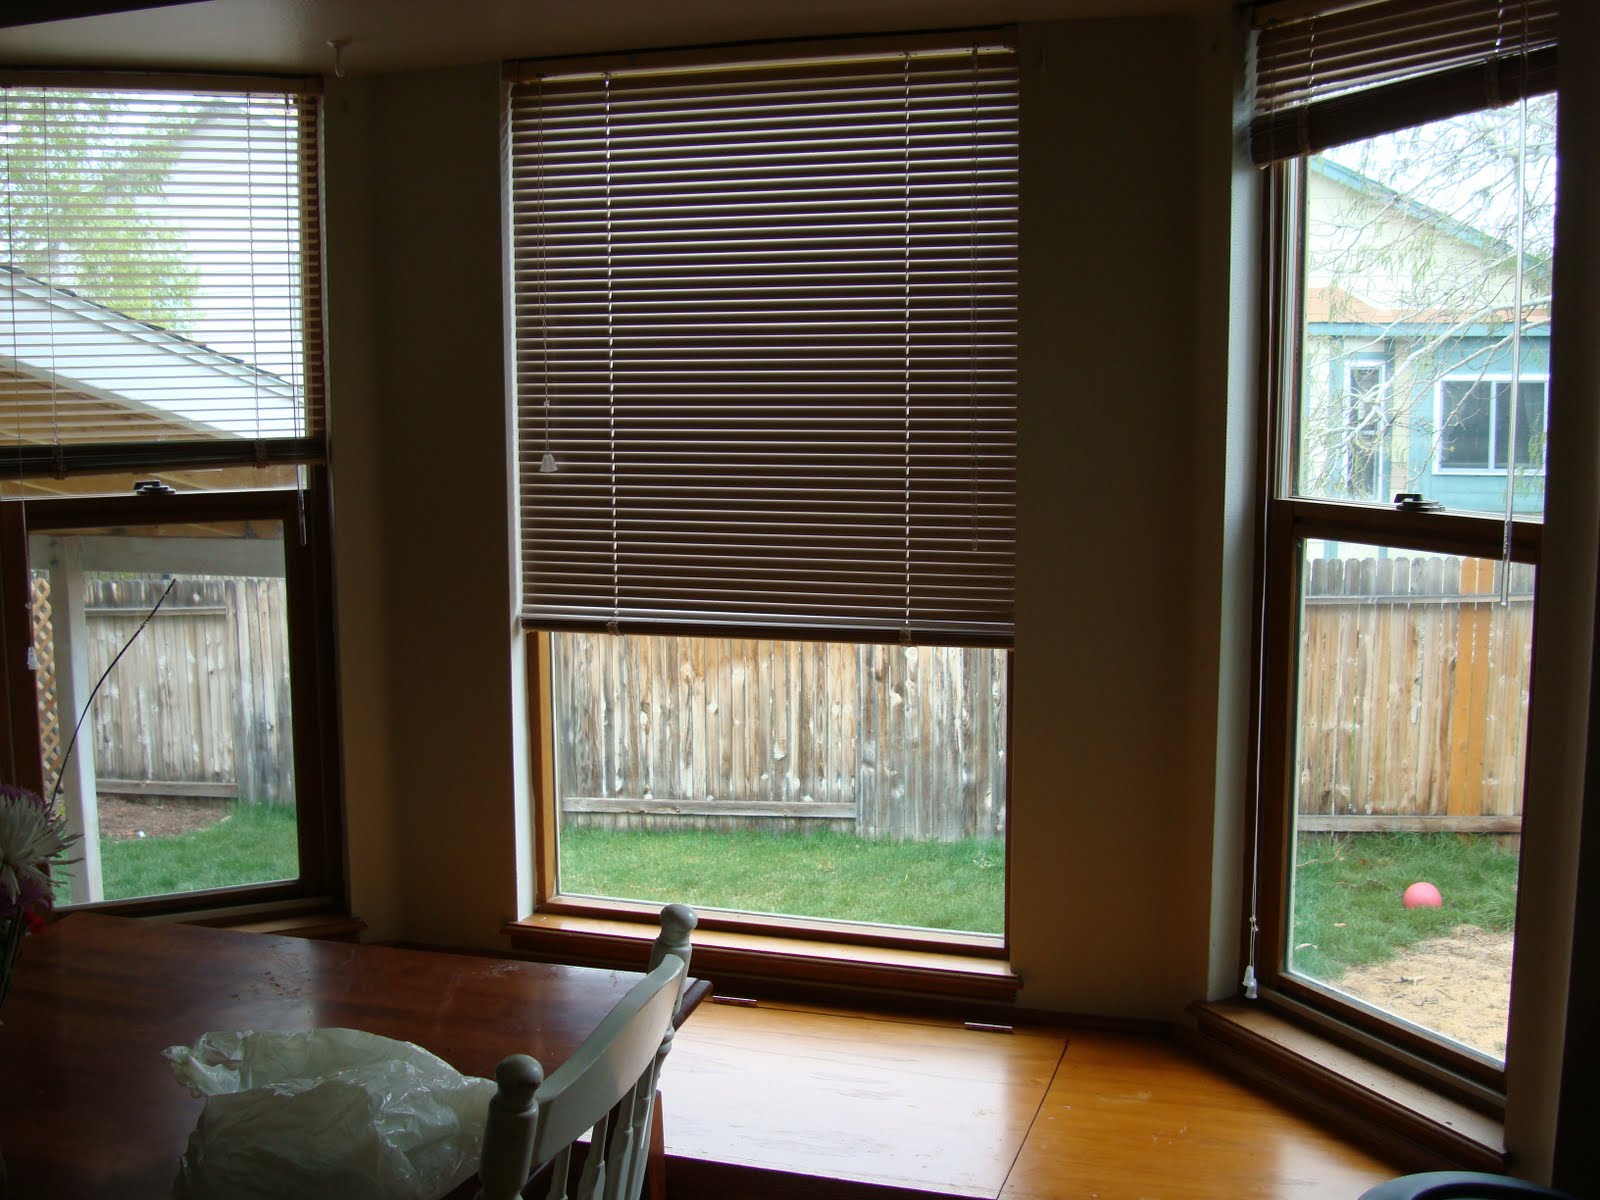
New Shades
Thanks to my cousin I am highly addicted to blogs! Who would have thought? She introduced me to the "Little Green Notebook" blog about four months ago. While she was browsing around she told me about this really cute and simple Roman Shades project. (I absolutely dislike my blinds--such a pain to clean and they don't let in much light.) Well, after four months of procrastinating and being afraid to jump in with two feet, I took my birthday money and went to Joanne's Fabric store and fell in love with the sage green burlap for 2.99/Yard. Now I had no excuses. I had to make-over my blinds.
You can always go to Jenny's Page for better instructions or just ask me!
Project Tools:
Iron
Enough Fabric to cover your window
(Measure your window space. Add 3" to the length and 3" to the width)
Fabric Glue
Hemming Tape (optional)
Scissors
Beads (optional)
Step One: Take down those dreaded, dusty blinds.
Step Two: Lay blinds on table face up. Mark every 10th shade. You don't want to cut the horizontal line that supports this shade. It's going to help make your "draping" affect.
.JPG)
.JPG)
Step Three: See these skinny strings vertical in this picture? These are the little strings that you need to cut. (When the blinds are hanging they will be horizontal. They are also the strings that allow you to open or close the shades. Cut each one except for the ones supporting the 10th shade.)
.JPG)
Step Four: Each shade has a string holding it into place. You need to untie that string and free the extra shades that are not going to be used. In this picture (below) I untied the string pulled it through all of the shades and then re-laced the 10th shade back in place.
.JPG)
Step Five: After step 4, you should have something that looks like the below picture...Now, lay your fabric under the blinds--The blinds should be facedown. (I don't have pictures of this part sorry.)
Go to the top of your fabric. Measure 1.5" inches and 1" from the top. Use hemming tape to help 1" from the top.
.JPG)
Step Six: Attach the top part of your blinds to the hem using fabric glue. Remember you have an extra 1.5" on either side, you will need to fold those in before gluing the top of the blind to the 1" top hem.
.JPG)
Step Seven: (sorry no pictures again) But do look back at Step five and it's picture. After gluing the top of the blind to the top hem, continue measuring down your "straight line of fabric" 1.5" (this will be your side hem.) Line your shades along this line. Make sure that the blinds are pulled straight and taunt.
Step Eight: Fold over your hem and iron in place. (Don't use your fabric tape yet!)
Step Nine: Make sure all of the shades are pushed into the hem you just completed. Now measure 1.5" inches from the shade on the other side. Cut fabric (if you already haven't.) Fold and iron your other side hem.
Step Ten: Make sure everything is straight and taunt. Start from the top of the blind and work your way down. Place glue on the "front of the blind" then flip over and press to the fabric. Continue this process until you reach the bottom.
Step Eleven: Now it's time to use your fabric tape (or glue) and finalize your side hems.
Step Twelve: Measure a 1" bottom hem and glue/tape into place. Mine hang free and are not attached to the bottom of the blinds.
Enjoy your shade!
.JPG)

I took one more step...I didn't like the cheap plastic tassels so I created my own.


Saturday, May 15, 2010
J is for Jaguars!
I watch two little girls along with my son Tuesday thru Friday and I'm always looking for cute little projects for them to complete. I hate not developing skills and doing creative art or science. Three year olds are so easy to entertain. Something that seems ridiculously easy to us can be very educational to them! For example--melting ice in a cup. Who knew that ice was actually water when it gets really really cold? I know I didn't! (Insert sarcasm obviously.) When my friend told me about this awesome website, "Totally Tots", I fell in love! I was already completing science projects and making up my own "letter of the day" projects, but Totally for Tots made it much much easier.
Last week's "letter of the day" was "J". We used "J" for jumping, jungle, jaguar, and jack-rabbit. (note: get 3 three year olds trying to jump in one room--hilarious!) I decided to try out "Totally for Tots" "J" project. Here are the results.
I'm poor and didn't have foam so I adapted and used construction paper. The children loved the project and at one point said "This is kinda hard!" (They had to use pincher fingers a developing technique for all three of them!)
I started with drawing a simple block "J" and then little heads to go with them.

Then I dug out my trusty hole puncher and started punching holes for the Jaguar's spots.

Now that's a lot of holes!

This is my son Tyler. He thought this was a great project and quickly put black dots all over his Jaguar!

What a ham!


Subscribe to:
Posts (Atom)